Monday, December 29, 2008

Standing Seam Metal Roof


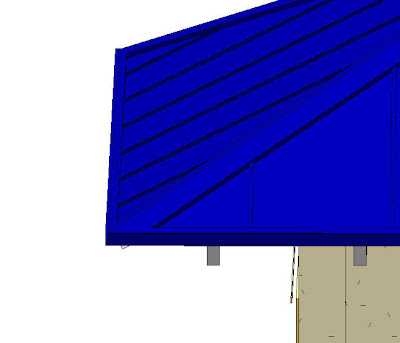
Here is a trick to create the look of a true standing seam metal roof in Revit.


First start by creating the roof with generic roofs that are thin I use 2". I was then able to duplicate each of my roofs in their same locations. I changed one of my roof types to "slopped glazing", this is a roof type that is a curtain system.


Second I set up our roof types. Start with the easy one, customized the type "Generic 2 inch" to "Seams" with correct material settings for the metal roofing (we will come back to this roof later). Then "Sloped Glazing" to "Metal Roof", this one will take some modifications. You will need to created a curtain panel that is 1/4" thick to use for the main field of the metal roof. We will also need a profile shape that is the size and shape of our standard field seams. I used a simple rectangle with type parameters to adjust width and height as needed. Then go to your new "Metal Roof" type and edit the type properties. Set Grid 1 Pattern to spacing for seams. Set Grid Mullions - Interior Type to Metal Roof Seam Profile. (You may have to adjust the profile insertion location up and down to have it site on top of the roof.


Now you should have two roofs with in each other. The final touch was to use "Opening by Face" tool on each of the roof faces or the Seams roof "the basic roof" to cut out for the Metal roof to show through. This will give you both the seamed in-field and the ridge/hip/valley pieces.

Add Image

Tuesday, December 23, 2008

Tip: Monday means make a new local file.
On Friday afternoon the BIM manager will have done the entire cleanup necessary for CentralFile maintenance. After going through all these maintenance methods or if it is just Mondaymorning make a new Local File. By creating a new Local File every Monday morning the userwill not bring any old problems back into the Central File.

Tuesday, December 2, 2008

*Now I have created a Central File, where do I go next?

You do not actually work in the Central File, you work on local copies. Local copies are created by copying or saving the project to a your workstation. When this happens a data link is created to help check and reference data between the local copy and the central file.

*What is the best way to create a local copy and is there any suggestions?

The two main ways are to save as and copying while in windows explorer. Copying with window explorer is my preferred option. First, it takes less time, you do not have to open it and and then re-save. Second, most people open the Central file and forget to save it to their local workstation.

*Is there some best practices for file name to reduce confusion.

Yes, always add in all caps CENTRAL to the end of the central file when naming and as users create there local copies they should remove CENTRAL and add there user name in all caps.